You’ll need:
Pattern
2 complementary pieces of scrapbook paper, each cut 7 ¾” x 8 ¾”.
1 piece of Pellon Peltex cut 7 ¾” x 8 ¾”. Be sure to avoid the fold in the Pellon, as it can cause wrinkles in your final piece.
2 pieces Heavy Duty Pellon Wonder Under Fusible Web, each cut 7 ¾” x 8 ¾”.
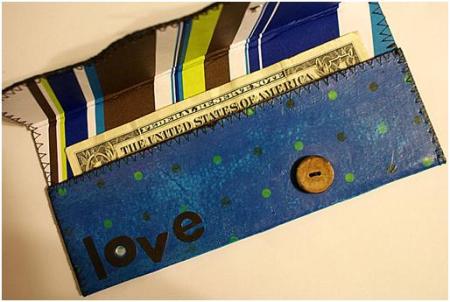
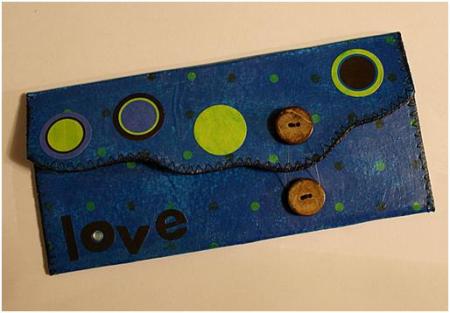
2 buttons
Quick-set glue of your choice
Adhere each rectangle of Wonder Under to each side of the Peltex per manufacturer’s instructions. Allow to cool. Remove one of the paper backings from the web and position one of the scrapbook papers to one side of the Peltex. Fuse it per the manufacturer’s instructions. Flip the sandwich over and do the same thing to the other side. Allow to cool. You now have your base.
Take your pattern and lay it on top of your sandwich, inside of the wallet facing up. Cut it out, taking care to not bend your project.
Leave the pattern on the project and place a straightedge along one of the fold lines of the pattern. Carefully fold the edge up, towards the middle section. Turn the project around (inside of the wallet still facing up) and straightedge fold the other line.
Using a marker that matches the papers, color the edges of the project piece. Now distress the whole OUTSIDE of the wallet with sandpaper, if desired.
Stitch the button onto the bottom third of the wallet, near the bottom, making sure you’re attaching it to the outside of the wallet, so that when it’s folded up and stitched, the button remains on the outside. Put a drop of quick-set glue on the button threads inside the wallet.
Zigzag stitch along the bottom edge of the project piece. (When completed, this edge becomes the top of the pocket and the flap covers this edge when closed.)
Fold this pocket up and stitch all the way around the 3 sides of the wallet (the bottom is just a fold).
Attach the flap button to the flap. I positioned mine in line with the pocket button, but you can certainly attach it wherever you want. Again, add a drop of quick-set glue to the button threads for security.
Embellish your wallet to your liking, keeping in mind that decorations protruding too much will catch on things inside of your purse and could cause damage to your wallet.
Coat the whole OUTSIDE of the wallet with soft gel medium. I tinted mine with a little bit of acrylic craft paint. This makes the distressing pop and gives the whole outside a nice tone. I allowed mine to dry and then gave it a second coat. Note: When coating, be careful not to glue your button down along the edges.
Take a piece of the Stretch Magic cording and make a loop. Tie the two ends together in a knot, leaving the tails about 2″ long (to work with in a minute). Before knotting, work with the elastic to make sure the loop is going to easily go over the bottom button. You don’t want it too tight or too loose. That’s why I use this elastic cording: it’s very forgiving! DO NOT trim the tails.
Loop this over the flap button, tails at the top, with the loop pointing down towards the end goal button. Take the two tails you left yourself and bring them under the button and tie once. Then bring them back up around the button to the top and tie in a double knot. Carefully add a drop of quick-set glue to this knot and hold it in place for a minute to make certain it’s set. Once you’re sure it’s dry, trim the tails so that they’re hidden under the button.